Last Christmas we gave our friends a cake plate (from Pier 1) full of decorated cookies. In thinking about this year's cookies we had to dig out our old pictures. We had fun decorating the gingerbread angels and snowflakes and couldn't resist making each one different. This year we're putting the cookies on big serving plates we got at Pier 1.
Friday, December 14, 2012
Saturday, November 10, 2012
Cowboy Cookies!
Walker's turning one! That means it's time to make more cookies. Betsy ordered the perfect cookie cutters - a cowboy hat and boot. We wanted the hats and boots to be tan and thought chocolate would taste good. I used at least 1/2 cup of unsweetened cocoa for one recipe of royal icing. Unfortunately I dissolved the cocoa in water before adding it to the already mixed royal icing, which eventually got the icing a bit thin. It still hardened without making the cookies too soft. After reading other recipes, I realized that I should have dissolved the cocoa in the water with the egg whites. I think the cocoa kept the flood icing from being shiny, but that's alright because cowboys don't wear shiny boots to the rodeo. When it was time to add details to the cookies, I tinted the royal icing with brown and added a little black to make it darker. Cameron came up and helped decorate. She's very creative. Just look at these adorable cookies.
Monday, August 20, 2012
Another Wedding
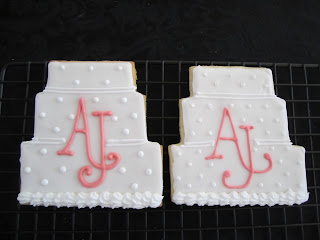
Wedding bells are ringing again. This time we had to make cookies for Anna's daughter. We've learned to stagger the process over a couple of weeks. First we bake the cookies and flood them. After they've dried overnight, we put them in the freezer until we're ready to add the design. We've left them in the freezer for two weeks without getting freezer burn. It only takes a few hours to dry the designs and they're ready to be bagged.
Monday, May 28, 2012
KidZNotes Cookies
After decorating 300 cookies for the KidZNotes gala, I don't think I'll ever forget what the perfect flood icing looks like. We also learned why you should sift the powdered sugar if you don't plan to mix it for 10 minutes. I tried a corn syrup recipe for the icing (against Betsy's advice) and won't do that again. There were visible lumps in the icing. The finished cookies looked pretty cute and even cuter when we tied the bags with musical note ribbon.
Tuesday, April 24, 2012
That's a Big Bow!
Monday, April 9, 2012
Little Duckies
Betsy decorated these adorable duck cookies for a baby shower. She painted the ducks and piped the water and dots!
Monday, March 5, 2012
It's a Girl!
The baby girl cookies are adorable! We have so much fun designing them that we make each one a little different. Betsy painted the dog cookies. What talent!
It's a Boy!
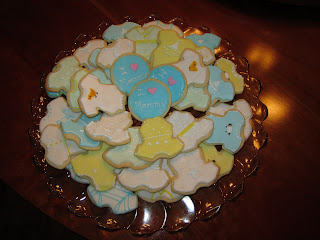
We're moving from bridal showers to baby showers. The onesie cookies are pretty cute. Instead of bagging the cookies as a favor, we served them on a platter.
Wednesday, February 8, 2012
Learn From the Experts
After our last mishap, we decided it was time to find a professional cookie decorator. We searched on-line and found Barbara, who was an enormous help. We tried using her cookie recipe, but our cookies didn't turn out so we decided to stick with what we already did well. One of her best tips was to get organized before we started decorating. That left us less flustered when it was time to mix and decorate. Barbara showed us just how long to beat the icing and what it should look like when it's ready to be used. Our next batch of cookies were much improved and the musical ribbon adds to the fun.
Friday, February 3, 2012
Hydrangea Cookies
After all of the mishaps with the purple sash cookies, we thought we knew exactly what to do this time. We got creative and decided to decorate our wedding cake cookies with hydrangeas. That overconfidence failed us once again. This time we beat the icing way too long and ended up with a sticky, marshmallow tasting flood icing. Another batch of cookies went into the trash. This time it only took us two tries. Lesson learned: beat the icing for only 10 minutes on low speed. Stir by hand if you need to add more water to thin the flood.

Thursday, February 2, 2012
Back in the Kitchen
This is what you call dedication. We're back in the kitchen for the third time, making the purple sash cookies. You might wonder why we don't just give up and buy some cookies from a bakery. That's what our husbands would suggest. But we keep thinking success is right around the corner. As the saying goes, "The third time's the charm." Our cookies were perfect and we presented them with pride. Now if we could only remember the process.
Tuesday, January 31, 2012
We Flunked Cookie Class 101!
We thought we knew exactly how to fix our purple sash wedding cookies. We baked another batch of cookies and promptly flooded them. Having ruined our last batch, we headed to the internet to see how long the flood icing had to dry. Everyone said, "Overnight." Being smart entrepreneur bakers, we decided that it might be best to let our cookies dry in the safe confines of the oven. Wrong. Guess what happens when you put cookies covered with wet icing in an airtight oven. The cookies absorb all the moisture from the icing, plus the icing doesn't harden. Batch number two was a soggy mess. The cookies fell apart when we picked them up. We promptly tossed them in the trash. Once again we have no pictures.
Learning the Hard Way
At this point in our cookie decorating career, we decided to continue with the trial and error method. I guess we like learning things the hard way. With another wedding coming up, we had a chance to practice a new cookie design. The pink bow was cute, but we wanted to expand our horizons. We thought we already new everything about the first layer of icing, called flooding, so we zipped right through that stage and excitedly added the next layer, a purple sash across the cookie with a big purple button on the side. The next day when we went to check on our cookies, we found that the purple icing had spread across our cake in an ugly blur. Our trial and error method had taught us a good lesson: always let the flood icing dry overnight if you plan to decorate with a different color! No pictures this time - these cookies went in the trash.
Our First Batch
It all started with the annual bake sale at our children's school. Every year we would bake and decorate gingerbread men, spreading them all over the kitchen and making a big fat mess. But we had fun and our cookies were sellouts. When our kids outgrew the gingerbread men, we turned to bridal shower cookies. We made 4" wedding cake cookies and decorated them with big pink bows. It took us hours and when they were done we thought they were beautiful. Looking back at those pictures we have to smile. Take a look at our first pride and joy. They look much better bagged.
Subscribe to:
Comments (Atom)


